Hip Rotation Prevents Knee Pain in Yoga
Knee injuries in yoga occur when hip rotation is not understood.
Hip Mobility Prevents Knee Pain in Yoga
You likely practice and/or teach yoga to be healthy, not to create injury! Yoga and knee pain should not go together. Many people that practice yoga have underlying knee injuries and many others simply begin to practice yoga and knee pain arises. With a basic understanding of the anatomy of the hip and knee you can help your students prevent injury and avoid knee pain in yoga.
Basic Anatomy of the Knee
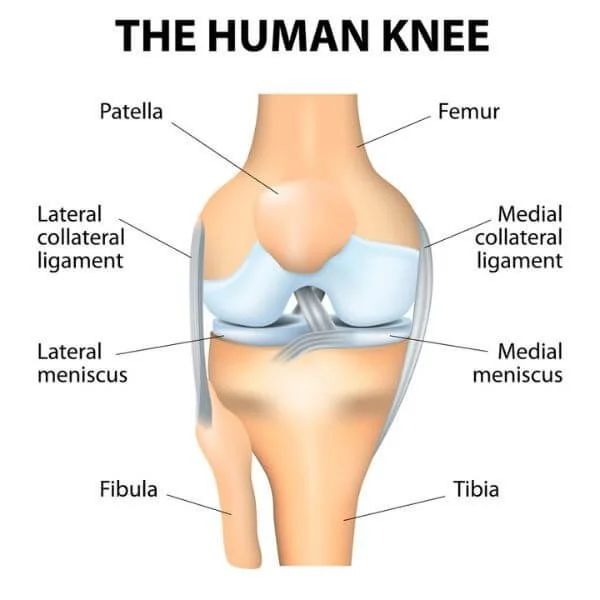
Your knee joint is made primarily of three bones: the femur (long thigh bone), tibia (shin bone), and the patella (knee cap). Your femur and tibia move forwards and backwards on each other causing the knee to bend and straighten. These motions are respectively referred to as flexion and extension of the knee and are the "hinging" motions of the knee.
A common misunderstanding of the knee is that it is only made to bend and straighten. Knee flexion (bending) and extension (straightening) are the larger and more obvious movements of your knee. However, the knee is not a true hinge joint as it is often mistaken to be. The knee also rotates! (See more about the Anatomy of the Knee in the last article titled “Put Your Foot On Your Knee in Tree Pose.”)
Many yoga postures require your knees to rotate. Given that rotation is a natural part of the kinematics of the knee, it is safe to allow the knees to rotate. However, it is unsafe to rotate the knee beyond its available limits. As a rule of thumb, if students feel knee pain with yoga postures, help them change the way they practice the posture.
Most knee injuries in yoga result from over rotating the knee in when hip mobility is limited. I’ve known several people that injured their knee attempting Padmasana (Full Lotus Pose).
Before looking at the biomechanics of full lotus pose, lets look at the anatomy of the hip.
Basic Anatomy of the Hip
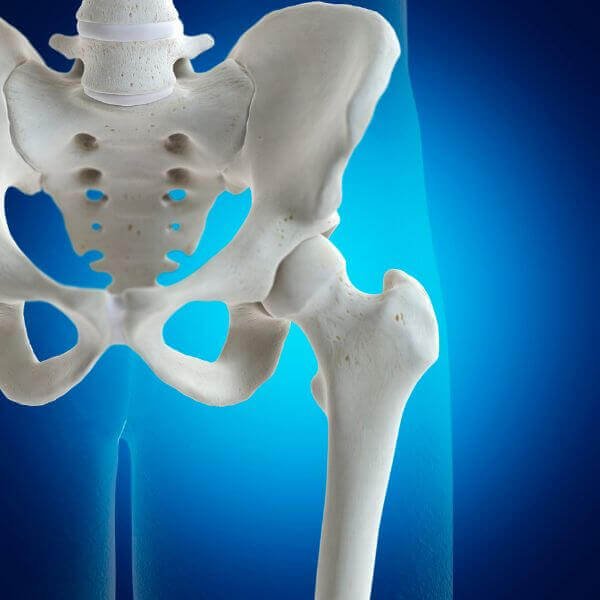
Your hip joint is consists of two bones: the femur (long thigh bone) and the pelvic bone. The top part of the femur is shaped like a golf ball. This is referred to as the head of the femur (or femoral head).
The pelvic bone has a large concave area called the acetabulum. This creates the socket for the femoral head.
The hip joint is a ball and socket joint. The femoral head rolls around inside the acetabulum allowing for a large variety of motions at the hip. Generally the hip has a large range of motion, and of course the amount varies amongst people.
Look At Hip Mobility with Padmasana (Lotus Posture)

In order to bring your feet up onto your thighs, it is essential to have a significant amount of external rotation in your hips. That is, your hips must be able to rotate open so that your outer thighs and knees come close to the floor. If your outer thighs and knees are supported on the floor or at least very close to the floor, your knees are in a position to attempt to bring your feet on top of the thighs without forcing excess rotation in your knee.
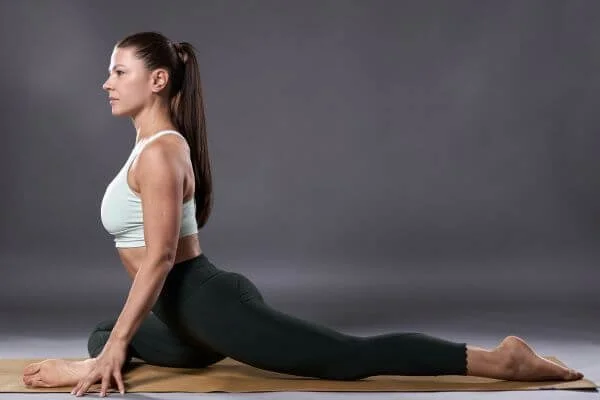
Lotus Posture requires excessive hip external rotation to keep knees safe.
The person in the photo above has access to significant external rotation available in their hips. Their thighs and knees are close to the ground and they come into lotus pose without forcing excess rotation in the knees.
The person in the photo below has limited access to external rotation in their hips and therefore their knees are elevated from the ground. To keep their knees safe, it is best to stay in a cross legged position rather than forcing lotus posture.

How do you know if you are forcing too much rotation at your knee?
Feel for any tension in your knee. When your knee is flexed, the only muscles being stretched should be the quadriceps. If you feel a stretching sensation or some tension just above the center of your knee, you are likely stretching your quadriceps which is perfectly safe and healthy.
If you feel tension on either side of your knee or deep in the center of your knee, you are likely stretching your ligaments. The role of ligaments is to hold bones together and to limit excessive movement! There are several ligaments in your knee that hold the femur and tibia together. In an attempt to come into lotus posture, it is relatively common to feel tension on the outside of the knee where the lateral collateral ligament is (see image above of the Human Knee).
If you feel tension on the outside of your knee and keep pushing yourself into full lotus, you may cause damage to your lateral collateral ligament or other ligaments of your knee. Ligaments are much different from muscles and stretching them beyond their limits leaves them weak and may lead to long term knee problems. A simple cross leg seat is a better option.

What About Hip Rotation and and Knee Pain in Pigeon Pose?
Eka Pada Rajakapotasana (Pigeon posture) also requires significant external rotation of the hip. This posture is often described as a "hip opener" and can be very useful in increasing external rotation of the hip. However, if you move into this posture beyond your limits of hip external rotation, your knee ligaments are at risk for injury. As described above, if you feel tension on either side of your knee or deep inside your knee, it is best to modify the posture so that your ligaments are not put under too much stress.
Choose a Modified Pigeon
1. Bend your front knee more!
Yoga teachers sometimes imply that that the front shin should be parallel to the front of the yoga mat in pigeon. That is a possibility and the direction to move towards to increase hip external rotation. It is not, however, necessary!! It is more than okay to bend your front knee more and bring your heel closer to your groin. This will ultimately decrease the tension in your front knee and reduce the risk of injury to the ligaments.

2. Rest your hip down on the mat.
A more supportive modification may be appropriate if you still feel pain in your knee. Bring your hip of your front leg down to the ground. As your hips gain range of motion, you can gradually begin to center the hips. For example, when your left leg is in front, rest the outside of your left hip and thigh on the floor and gradually send your right hip back down towards the floor. With time, your left hip may have increased external rotation and you may be able bring your left hip back up so that both hips are centered.
3. Lie Down for a Reclined Figure Four Posture.
A third option is to lie on your back and practice "reclined figure four". Bend both knee with your feet on the ground. Then cross one leg over your other thigh to create a triangle with your leg. Reach one hand through the triangle and your other hand on the outside of the uncrossed leg. Pull the thigh of the uncrossed leg towards you and you will stretch the outside of that hip. This gives you a similar position in the hips as pigeon posture without the stress on your knees.

Throughout your yoga practice be mindful of your knees. If you feel any sharp pain or overbearing tension on the sides of or deep in the knees, back out of the posture and find a modification.
Flex Your Feet to Activate the Muscles Around Your Knee!
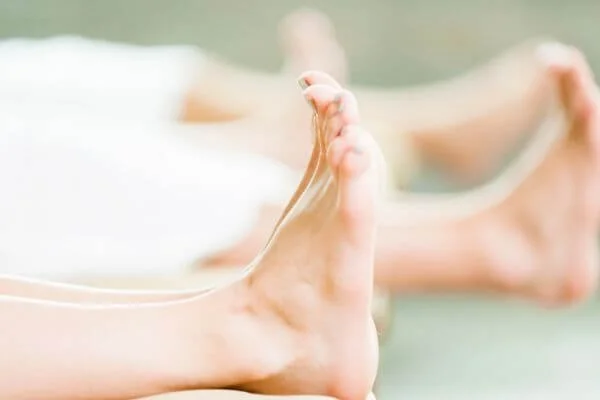
While teaching pigeon, many yoga teachers instruct students to activate the front foot and pull the toes back so that the ankle is in a neutral position. This helps protect the knee from excessive rotation as it causes the lower leg muscles to activate. Many of these lower leg muscles attach on the outside of your knee. If activated, they will support your knee and limit the excessive rotation that may cause damage to the ligaments.
Flexed feet activate the muscles in the lower leg and help support the knee joint.
Remember, yoga and knee pain need not go together. Being mindful of the position of your knees is not only important to prevent an injury or knee pain, but also to maintain healthy alignment of your knees for the long run. By keeping your ligaments stable and your knees in neutral alignment, stress on your knees is limited. As with most things, limiting stress on the knee joints, will allow the knees to live a longer, healthier life.
Ready to teach yoga with confidence?
Discover Power to Lead 200-Hour Yoga Teacher Training in Lisbon, Portugal. Led by Dr. Trish Corley - the only yoga teacher training in Portugal taught by a Doctor of Physical Therapy.
[Learn more about the 200 hour yoga teacher training in Lisbon]
About the Author
Dr. Trish Corley, PT, DPT (physiotherapist), E-RYT 500, is the founder of Yoga Anatomy School and a former anatomy professor with over 23 years of clinical experience. She has been teaching and mentoring yoga teachers in anatomy and biomechanics since 2012.
Explore the Yoga Anatomy Online Course at TrishCorley.com/yoga-anatomy-course.
For more articles and insights, visit TrishCorley.com.