Elbows By Your Sides in Chaturanga?
As yoga teachers, we often find ourselves using various cues to guide our students through different postures. One such cue that you've probably heard and used is to "bring the elbows by your sides" in chaturanga. But have you ever stopped to think about why we give this instruction? Surprisingly, it has nothing to do with the elbows themselves. Understanding the true anatomy behind this cue can reshape the way we teach and help us provide more effective guidance to our students.
Why Do We Say "Bring Your Elbows By Your Sides" in Chatarunga?
Let's dive into the anatomy of the elbow to get a better understanding.

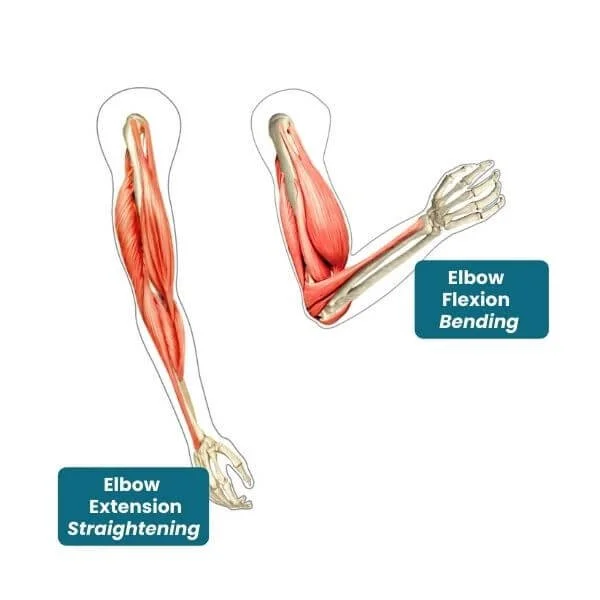
The elbow joint is composed of three main parts:
1. Humero-ulnar joint: the upper arm bone and the lower arm bone on the pinkie side of the arm
2. Humero-radial joint: the upper arm bone and the lower arm bone on the thumb side of the arm
3. Proximal radio-ulnar joint: the two lower arm bones (radius and ulna)
The humero-ulnar joint is a true hinge joint that consists of the humerus (upper arm bone) and the ulna (the long bone in the forearm on the pinkie side). It allows for bending and straightening of the elbow only. It is similar to a door hinge in that it only allows for back and forth motion.
The humero-radial joint is a pivot joint that consists of the humerus (upper arm bone) and the ulna (the long bone in the forearm on the thumb side). It allows for the radius to rotate (or pivot) on the humerus. In other words, the radius turns and ends up crossing over the ulna. This rotational movement is called pronation. It also moves in the opposite direction (uncrossing of the two bones) which is called supination.
The radius and ulna also connect to each other at the proximal radio-ulnar joint. Therefore, the rotational movements of pronation and supination also occur at the proximal radio-ulnar joint.

So what does all this anatomy have to do with the elbow position in chaturanga?
Since the humero-ulnar joint is a true hinge joint that only bends and straightens, it cannot be responsible for having the elbow close to the body or away from the body.
The joints that are responsible for pronation and supination have some impact on where the elbows are, but since the hands are fixed to the floor in chaturanga, the amount of movement at these joints is limited.
What then, is responsible for the position of the elbows in chatarunga?
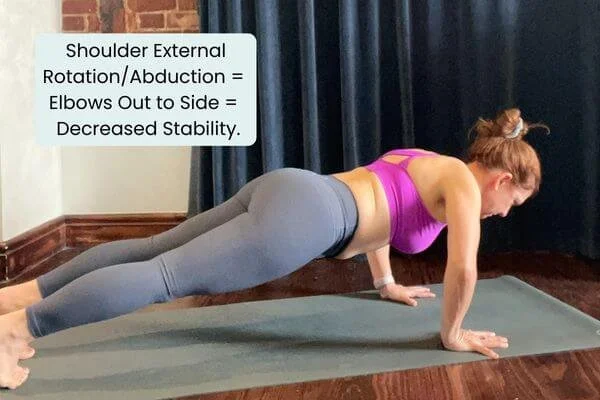
The movement needed to bring the elbow towards the side of the body (or away from it) comes from movement of the humerus. Recall that the humerus is a key bone in the shoulder joint. Movement of the humerus is equal to movement at the shoulder joint.
External rotation (and/or adduction) of the shoulder will cause the elbows to move out and away from the body when lowering down in chaturanga.
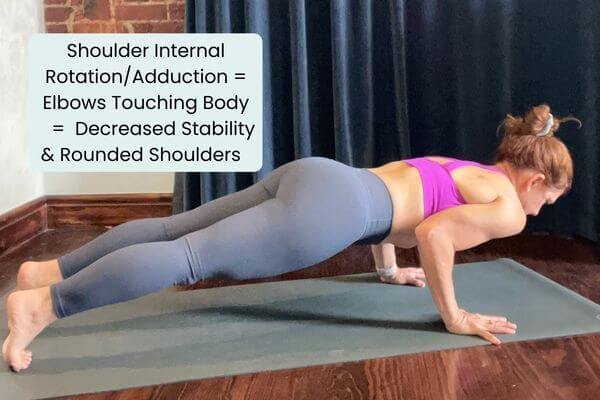
Internal rotation (and/or abduction) of the shoulder will cause the elbows to move in and towards the body when lowering down in chaturanga.
A relatively neutral position of the shoulder (without rotation or abduction/adduction) will cause the elbows to be at the sides of the body.

When the elbows are by the sides, the shoulders are in a relatively neutral position, without rotation. In this neutral position, the movement into chaturanga primarily involves shoulder extension. There is no shoulder rotation or abduction, so the movement is simple. This alignment likely creates more stability in the shoulders as it optimizes the engagement of the shoulder muscles, including the rotator cuff muscles, which play a vital role in shoulder stability.
On the other hand, if the elbows are away from the body, the shoulders tend to internally rotate. While this variation is acceptable, it can make it more challenging to maintain shoulder stability. If students lacks strength and endurance for the more challenging position, they may get frustrated and have higher potential for a rotator cuff or biceps tendon tear.
This is perhaps why the cue "bring your elbows by your sides" in chatarunga came to be. Elbows by the sides creates an opportunity for the most amount of stability at the shoulder. Perhaps teachers started seeing students brining the elbows out away from the body and responded accordingly to encourage a more neutral shoulder position.
Sometimes yoga teachers' cues stick and get passed down without teachers fully understanding the 'why' behind them. When yoga teachers share the cues without understanding the 'why', it's quite common for the cues to get misinterpreted. If you don't know the "why", you cannot determine if a student is misinterpreting the cue. In the case of "bring your elbows by your sides' in chatarunga, teachers see the elbows touching the sides and assume it's what the student is supposed to do -- even if it's actually less than optimal alignment!
I often see students go too far in bringing the elbows by the side in chaturanga and they end up hugging their elbows all the way into the body, and sometimes even under the body a bit.
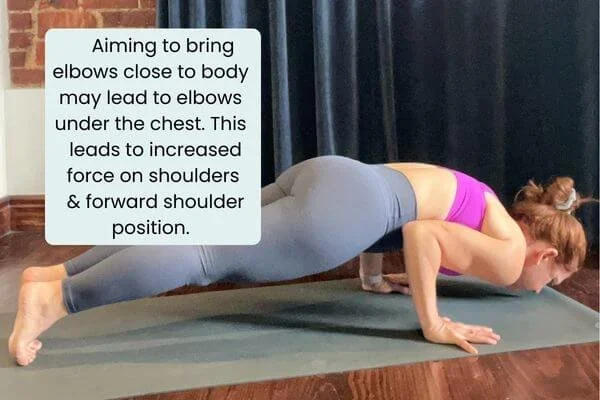
If the elbows are brought too far into the body during chaturanga, students may unintentionally shift the weight of their body onto their elbows. While this variation is acceptable, it can diminish the experience of building strength in the upper body. This way of practicing chaturanga generally creates increased force on the front part of the shoulder joint. It also tends to encourage a forward shoulder position. As a result, the student may have an increased risk of overuse type injuries to the shoulder.
The shoulders play a vital role in chaturanga, and their alignment directly affects the presence (or lack) of stability in the posture. The optimal position of the shoulders creates smooth movement and builds strength while practicing chaturanga. When the shoulders are optimally aligned, the elbows naturally stay close to the sides of the body.
Encouraging students to find a balance between keeping the elbows by the sides and distributing the weight evenly through the hands and wrists allows for a more integrated and effective chaturanga practice. By maintaining this balance, students can fully engage and optimally align their whole body. In this context, the cue to "keep the elbows by the sides" in chatarunga encourages and reinforces optimal shoulder alignment.
Rather than fixating solely on the position of the elbows, we can emphasize shoulder stability and alignment when instructing chaturanga. Ultimately, the goal is to guide our students towards a mindful and healthy practice. By emphasizing the relationship between the elbows and the shoulders in chaturanga, we empower our students to make informed decisions about their alignment, helping them cultivate strength, stability, and body awareness.
Remember, understanding yoga anatomy is not only beneficial for us as teachers but also for our students. By providing them with the knowledge of how their bodies work and move, we enable them to make informed decisions on how to modify poses based on their individual needs and limitations.
Conclusion:
The cue to "keep the elbows by the sides in chaturanga" has nothing to do with the elbows themselves. It's all about shoulder alignment and stability. So if you really want to encourage optimal alignment, focus on the shoulders more than the elbows!
Ready to teach yoga with confidence?
Discover Power to Lead 200-Hour Yoga Teacher Training in Lisbon, Portugal. Led by Dr. Trish Corley - the only yoga teacher training in Portugal taught by a Doctor of Physical Therapy.
[Learn more about the 200 hour yoga teacher training in Lisbon]
About the Author
Dr. Trish Corley, PT, DPT (physiotherapist), E-RYT 500, is the founder of Yoga Anatomy School and a former anatomy professor with over 23 years of clinical experience. She has been teaching and mentoring yoga teachers in anatomy and biomechanics since 2012.
Explore the Yoga Anatomy Online Course at TrishCorley.com/yoga-anatomy-course.
For more articles and insights, visit TrishCorley.com.