3 Ways to Prevent Wrist Pain in Yoga
Wrist pain in yoga is common, but there are simple steps to help prevent it.
One of the most common complaints I get from yoga students after a vinyasa flow class is that of wrist pain “from all of those chaturangas”. Do you also hear students complain about wrist pain in yoga? Yes, it is true that we are human beings and by the looks of it, we were created to support ourselves on our feet. After all, we are a species evolved enough to not need our hands for locomotion! In this article we will explore the anatomy of the wrist, common reasons for wrist pain in yoga, three ways to prevent wrist pain in yoga.
It's Common for Students to Experience Wrist Pain in Yoga
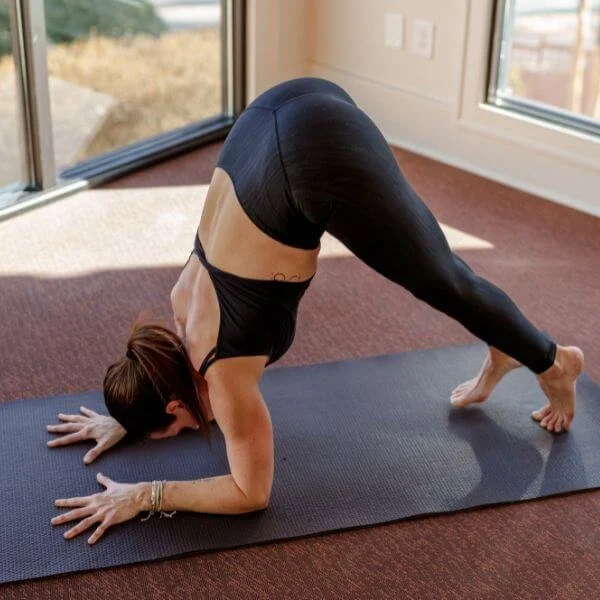
Downward facing dog, chaturangas, and other hand supported yoga postures are, however, an integral part of many yoga practices. Students often ask me if they should rest in child’s pose if they feel wrist pain in downward facing dog, or if they should do forearm plank instead of full plank to avoid wrist pain. My immediate response: “sure, you can always adapt the practice”. My next response: “Let me see your downward facing dog.”
Wrist pain in yoga is often associated with alignment and technique as opposed to a pathology or dysfunction of the wrist. Using the whole body and creating a firm foundation with your hands in downward facing dog can save you from nagging and sometimes serious wrist pain.
Yoga Anatomy of the Wrists and Hands
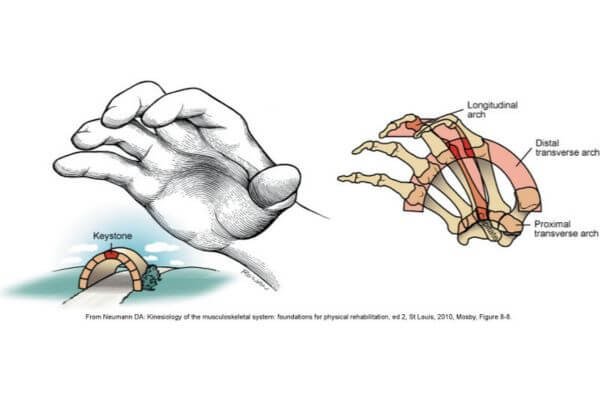
It is important to first get a basic understanding of the anatomy of the wrist and hands in order to understand how to prevent wrist pain in yoga. To begin with, look at your own hand. Notice that your palm has a concave surface. This is useful for cupping water into your hands and even more useful for creating support. Consider the creation of an archway in a building. The stone (or other building material) in the center is the “keystone” of the arch. Just like a building, your hand has an arch that provides significant support to both the hand and the wrist. (See the images below.) It is also important to note that under this arch in your wrist, there are some very important structures. In fact, this arch is actually a passageway to a tunnel. You may be familiar with the term “carpel tunnel syndrome”. Simply put, carpel tunnel syndrome is the irritation of the structures that run through the tunnel that lies below the arch. These structures include the median nerve and the tendons of the muscles that are responsible for wrist flexion (bending your wrist so that your palm moves towards your forearm).
Movements of the Wrist: Flexion and Extension
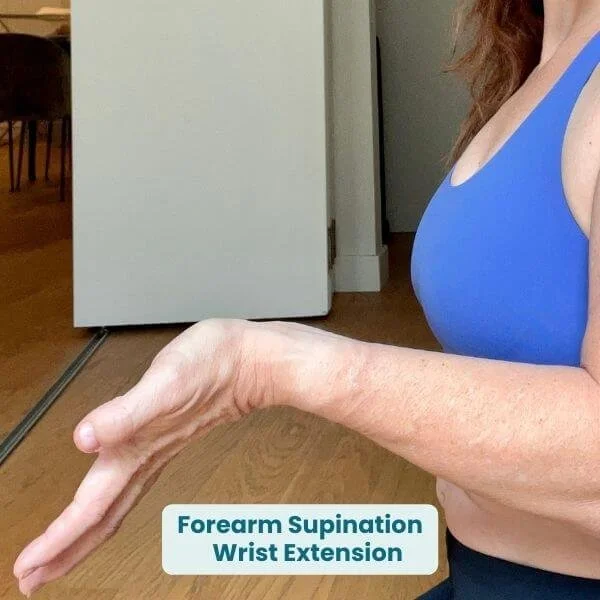
Hold your hands out in front of you with your palms facing up. This is forearm supination. Now, bend your wrists so that your palms come up towards your face. This is wrist flexion (with forearm supination). Now, lower the palms away from you (with the backs of your hands going closer to the floor) and you have wrist extension (with forearm supination). It is important to realize that wrist flexion and extension are always what they are, but may appear different depending on the position of your forearms.

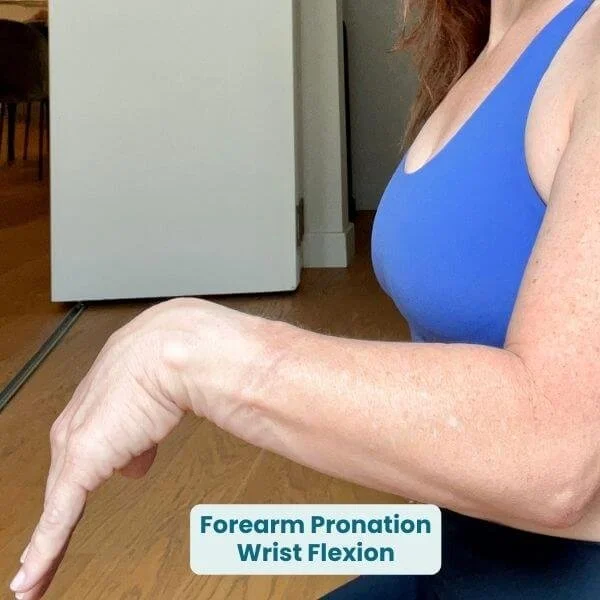
Now hold your hand out in front of you with your palms facing down. This is forearm pronation. Bend your wrists so that your palms go closer to the floor. This is still wrist flexion, but now with forearm pronation. Lastly, bend your wrists in the other direction so the backs of your hands come towards your face. Now you have wrist extension with forearm pronation.

The muscles that flex your wrist run down from your elbow along the front of your forearm (palm side). You can feel the meaty part of these muscles close to your elbow. Look at the picture and notice that the muscles have long tendons. These are the tendons that run through the carpel tunnel. Feel your own wrist flexor tendons just above your wrist (on the palm side).
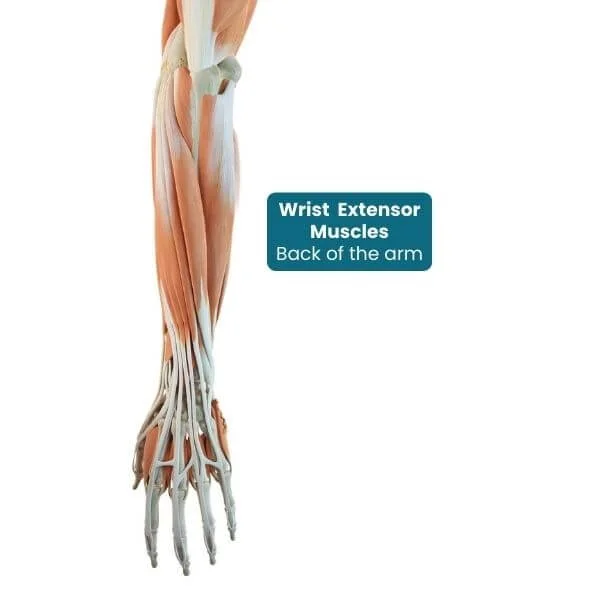
The muscles that extend your wrist are in an opposite position. Look at the picture and notice the wrist flexors as they run down from your elbow along the back side of your forearm. You can feel the meaty part of the wrist extensor muscles close to your elbow on the backside of your forearm.

In yoga postures such as downward facing dog, the wrists are in a position of extension. That might lead you to believe it would be best to activate the wrist extensor muscles. But that's not the case!
It is more important to activate the wrist flexor muscles in down dog and postures where you are weight bearing through the hands!
Now that you know some of the anatomy of the wrist and hand, let's dive into the three streps to prevent wrist pain in yoga.
THREE STEPS TO PREVENT WRIST PAIN IN YOGA
1. Focus on the Whole Body - Not Just the Wrists
It's normal to think that if someone experiences wrist pain, the problem must be at the wrist. This is often not the case though. In my observations, one of the most common reasons students experience wrist pain in yoga is because they are not using the rest of their body. For example, they come into downward facing dog, a pose in which much of the body weight needs to be supported by the hands, and they just collapse into the hands.
At Yoga Anatomy School we spend a lot of time breaking down body parts and yoga poses so that we can learn. Anatomy is the study of dissected parts and their inner workings that create the whole. So while it's great to break down the whole in order to better learn and understand how the body works in yoga, it is essential to practice asana using the whole body. That's why we also spend a lot of time at the Yoga Anatomy School focused on Balanced Postural Alignment of the whole body. I've seen students get rid of their wrist pain just by pressing the four corners of their feet down!
I mentioned that I will say to a student who complains of wrist pain in yoga class, "let me see your downward facing dog." Once they come into downward facing dog, I first look at their hand alignment and likely refer to #1. Then I address the alignment of the whole body. Using the principles of Balanced Posture, I can usually help them get rid of the wrist pain.
[Balanced Posture Alignment is the framework I created to simplify the process of understanding yoga anatomy and alignment. It is at the foundation of my courses and the Yoga Anatomy School's yoga teacher training. Rather than trying to figure out and memorize the alignment for every pose, we teach you sixteen cues that work in every single pose. These lessons are what allow teachers in our programs to help students of any level fine tune their practice and manage injuries.]


2. Create the Arch in Your Hand
In downward facing dog and other weight bearing yoga postures such as plank, your wrists are in a position of extension. Consider now, the force that is being put on the concave arches of the hand. Your own body weight will put pressure to flatten these arches. You can, however, prevent this collapse by activating the muscles that flex the wrist. Remember, the muscles that flex the wrist have their tendons resting in the tunnel. If they are concentrically contracting, they will help oppose the force on them.
How do you get the wrist flexor muscles to contract to support the arch of the hand? Press the four corners of your hand down in to your mat. Go ahead, give it a try. You can even put your hand on your desk or counter top if you are not on a yoga mat right now. With the palms side of your hand down, press down. This activates the wrist flexor muscles and creates a lift in the arch of the hand.
Some yoga teachers say "press your palms down into the mat." I suggest avoiding this cue as students then tend to press the center of their palm down. This action creates a compression of the arch. If the arch is present, there is actually a little pocket of air under the center of the palm. I like to encourage students to imagine their favorite little bug is under their hand while in downward facing dog and they don't want to squish the bug. "Leave space in the center of your palm for your favorite bug and press the four corners of your hand down." It is also best to spread the fingers out as far as you can. This helps with the contractions of the hand muscles and creates a wider base of support. Wider base of support ensures more stability.

3. Adapt the Pose
Adaptations and modifications of poses are key to helping students manage challenges. The best yoga teachers are strategic in their approach to offering adaptations. If someone is experiencing wrist pain in downward facing dog, an adapted version of the pose is what they may need. Let's consider options for downward facing dog:
1. Create a version without weight-bearing through the arm. For example, dolphin pose could be used. The benefit here is that a student could easily use this option in a group yoga class as it's pretty similar to downdog and has many of the same benefits. The downside is that it does not allow the student to experience any weight-bearing though the wrists/hands.
2. Use blocks under the hands. The use of blocks under the hands takes some tension away from the long tendons of the wrist flexors. This will help the student activate the wrist flexors which helps increase the arch. The arch provides support and that may be what is needed to prevent the wrist pain.
.
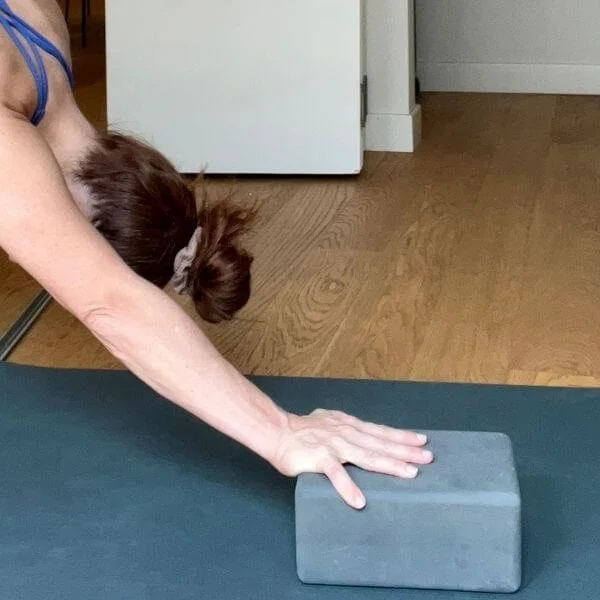
3. Decrease the amount of weight bearing on the wrists by using a wall, a chair, or another elevated surface. This is a great option because it allows the students to experience some weight bearing which may be needed to build up tolerance to the weight bearing. They can also progress from a higher surface to a lower one - this will gradually increase the amount of load they have to bear through their hands and wrists.

Ready to teach yoga with confidence?
Discover Power to Lead 200-Hour Yoga Teacher Training in Lisbon, Portugal. Led by Dr. Trish Corley - the only yoga teacher training in Portugal taught by a Doctor of Physical Therapy.
[Learn more about the 200 hour yoga teacher training in Lisbon]
About the Author
Dr. Trish Corley, PT, DPT (physiotherapist), E-RYT 500, is the founder of Yoga Anatomy School and a former anatomy professor with over 23 years of clinical experience. She has been teaching and mentoring yoga teachers in anatomy and biomechanics since 2012.
Explore the Yoga Anatomy Online Course at TrishCorley.com/yoga-anatomy-course.
For more articles and insights, visit TrishCorley.com.