#1 Way to Prevent Wrist Pain in Yoga
Before you learn the best way to help yoga students prevent wrist pain, let me ask you this:
Did you catch last week’s article on the #1 way to help yoga students with back pain? If so, you learned that it’s more important to listen to a student before making any decisions about how to help them with pain.
When it comes to wrist pain, it will also be more important to listen what the student has to say before offering any help. There’s no need for me to get back on that soap box though. If you missed the article from last week, you can read it HERE.
Ok, back to preventing wrist pain in yoga.
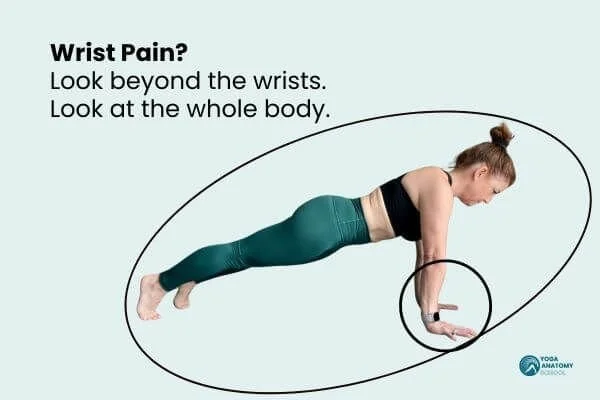
Wrist pain is for sure one of the most common complaints I hear about, particularly when it comes to vinyasa yoga. Most people are quick to blame all of the planks, chaturangas, and downward facing dogs.
Well, those postures likely have something to do with wrist pain, but let’s not blame the postures themselves. After all, there is no “bad posture” except the one that is held too long without the necessary amount of strength and range of motion.
We need to look at what the whole body is doing!
So there you have it.
The #1 way to help yoga students prevent wrist pain is:
Look at their whole body!
If someone tells you they have wrist pain in plank, it might seem obvious to look at their wrists in plank. And if you skip the listening part, you might even just agree with them that plank causes wrist pain. Don’t jump on board with blaming plank!
While the position of the hands and wrists may influence the experience of wrist pain, the pain in the wrist may have nothing to do with the hand or wrist.
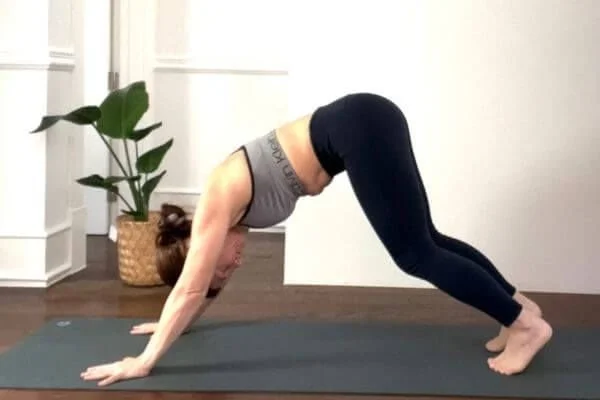
One of the most common reasons students experience wrist pain in yoga is because they are not using the rest of their body. For example, they come into downward facing dog, a pose in which much of the body weight needs to be supported by the hands, and they just collapse into the hands. If you take a look at their feet, you might notice they are just kind of hanging out in downward facing dog and their feet/legs are not active.
I've seen students get rid of their wrist pain in downward facing dog just by pressing the four corners of their feet down.
So here’s my point. You have to look at the whole body.
Here’s another way to look at it. Every posture involves the whole body. You can’t remove your arms from your body just because you think you don’t need them. They are still there.
Think of your body like a team with many players. Sure, some team members have different roles and may be better suited for different activities, but the team works best when everyone works together.
Your body works best when all the parts work together. If your feet just hang out in downward facing dog, the wrists may get annoyed….they may even speak up in the form of pain! It’s like they’re saying “Hey there feet, it’s pissing me off that I have to take the whole load here. Can’t you do some of the work?”
You can try this for yourself, come into downward facing dog and be intentional with letting your feet and legs do nothing. Hold the posture for at least 5 breaths. Observe what you feel in your wrists.
Then press the four corners of your feet down into the ground and observe what your wrists feel.
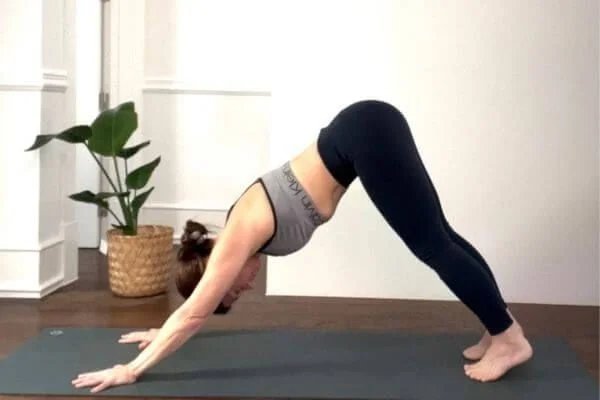
The wrists won’t take all the weight of the body if the feet take some. It’s the whole body working together concept.
If want more simple tips and step by step processes to help yoga students manage pain or injuries, this course is for you!
In the Teach Yoga to Students with Injuries Course, there is a whole workshop that focuses on the yoga teachers mindset. There are four modules in total that will set you up to confidently work with students with pain and injuries..
#1 Mindset and Your Role:
Have the tools to truly believe in your own ability to listen to others and guide them on their path to health and wellbeing.
#2 Science of Healing and Pain:
Learn the physiological phases of healing and be able to use this knowledge to best guide your students who are recovering from injuries. Explore pain science and identify various factors that contribute to pain.
#3 Modifications & Systems:
Know various ways to modify yoga postures to meet the needs of students with injuries and pain. Trust yourself to know when and how to adapt what you teach for students.
#4 Mastery & Mentorship:
Mastery comes from putting knowledge and skill into practice!
The final module focuses on a case study. That's right, you will see exactly how to apply all of the information from the first three modules! You will meet Lucy who sustains and injury but wants to keep practicing yoga; and you will know how to confidently support her in the healing process.
Learn more and enroll in Teach Yoga to Students with Injuries
About the Author
Dr. Trish Corley, PT, DPT (physiotherapist), E-RYT 500, is the founder of Yoga Anatomy School and a former anatomy professor with over 23 years of clinical experience. She has been teaching and mentoring yoga teachers in anatomy and biomechanics since 2012.
Learn more about the 200-Hour Yoga Teacher Training in Lisbon at YogaAnatomySchool.com.
Explore the Yoga Anatomy Online Course at TrishCorley.com/yoga-anatomy-course.
For more articles and insights, visit TrishCorley.com.