5 Simple Steps to Learn Yoga Anatomy
Dr. Trish Corley uncomplicates anatomy so that yoga teachers actually learn it.
You may have noticed that my recent blog posts and social media have been focused on making anatomy simple.
You may also notice a lot of noise across social media about keeping up with science and research and applying it all to yoga practice.
I’m all for using science and research to support health and fitness. All I heard while earning my doctorate degree in physical therapy was "Evidence based practice!" I think most yoga teachers are in support of using science and research in yoga.
However, the reality is that most yoga teachers are not ready to use scientific research and they don't need to feel pressure too, but......
Being able to read and understand a scientific research article is actually an advanced skill that usually takes a lot of practice and training. Being able to extract and apply reliable content from a research article AND put it into practice is an even more advanced skill that takes at least a couple years to master.

Okay, let me get to the point!
I’ve talked to enough yoga teachers that feel like anatomy is way over their head. So instead of pushing scientific literature and advanced biomechanics, I’m here to provide a simple framework to actually learn anatomy.
The Framework is Balanced Postural Alignment. It starts with 16 anatomy informed alignment cues that yoga teachers can start using as soon as they learn them.
Instead of learning a lot of detail about anatomy and then trying to make sense of it, there’s a simple 5 step process.

1. Learn Anatomy Informed Yoga Cue
Start by learning a cue that speaks to the anatomy of the body. For example, "Stretch your toes out as far as you can." This cues speaks directly to the toes. When students hear this cue, they know what to do. They will automatically activate muscles in their body to make their toes move.
2. Practice the Cue
Many yoga teachers learn best on their yoga ma and also want to practice yoga. How about you? Well the second step to understanding the anatomy is to get on your mat - or at least stand up wherever you are.
It’s best to start in Tadasana (Mountain Posture). Put the cue into your own body. Go ahead and stretch your toes out as far as you can. Feel what is happening in your body. In many cases, you can also look at what's happening. For the toe spreading cue, look at your toes and see them move!
After you practice the cue in Tadasana, play with the cue in other postures. For example, come to upward facing dog. You won't be able to see your toes now, but you can feel what's happening. What other posture do you want to play with?
If you have grabbed the 16 Anatomy Informed cues from Balanced Posture, some of the cues may make more sense than others to you. That's completely normal. Meet yourself where you are and know that just by experiencing these cues you are learning anatomy and already a more knowledgeable yoga teacher!

3. Learn the Basic Anatomy That Support the Cue
This is where the framework makes it so simple to learn and actually apply anatomy to yoga. By learning the cues first, you have actually already applied the anatomy before you even learn it. Once you learn the basic anatomy you will really understand why the cues make sense.
It’s kind of like learning how to ride a bike. If you don’t have a place to ride the bike, you might not have as much interest in learning how to ride it. But if you’ve already experienced the path by walking and imagined riding a bike on that path, your interest to learn how to ride will increase. And here's the big bonus - once you learn how to ride the bike, you already know where to go!
When it comes to learning the anatomy behind the cues, start off with just the basics! Think major bones and joints, and in some cases the major muscles — nothing too complicated.
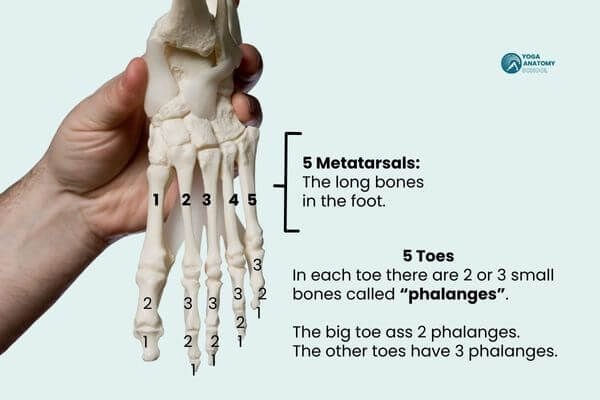
In the example of stretching the toes out as far as you can, take a look at the bones of the foot. Notice that there are 5 long bones in the foot (metatarsals) and then the small bones of the toes. Look closely at the picture. Then look at and touch your own foot. Find the bones in your foot.
When you stretch your toes out, you actually move the metatarsals and toe bones away from each other. All of the little bones in the foot need to be able to move in order to help you balance. Stretching the toes out makes space for movement at the toe and foot joints.
A lot of yoga teachers give up on learning anatomy because they don’t learn practical information right away.
The goal of my Balanced Posture framework is to ensure people experience success in learning anatomy. Once that happens, they want to keep learning and dive deeper into anatomy. Trust me - you can always dive deeper. I've been studying anatomy since the mid 90's and I am still diving deeper and learning more.
Okay, speaking of diving deeper. Lets move onto the next step!
4. Practice the Cues With Your Minds Attention on the Anatomy You Know.
This one is similar to #2, but now that you understand the anatomy, you can visualize and feel what is actually happening in your body when you practice the cues. This is where there tends to be a lot of “aha” moments. I hear things like “Oh, now I understand why I used to struggle with that posture.” Or, “So that’s whats actually happening in my hip when I transition from warrior two to half moon!”
Now that you have learned more about the bones of your foot and toes, come into Tadasana. Look at your feet and visualize the 5 long bones (metatarsals) and little bones of your toes. Now stretch your toes out as far as you while you visualize and feel the anatomical parts of you moving. Play with looking at your feet while you do this and eventually with just feeling your anatomy. And like you did in #2, move from Tadasana to other postures. Remember, the goal is to experience the sensations of your anatomy moving as you implement the cue!
5. Teach the Cues to Someone Else
People who practice yoga but do not teach certainly benefit from the Balanced Posture framework. And though, the mission of the Yoga Anatomy School is to improve the health of modern society by better educating yoga teachers.
Therefore we want to ensure teachers and teachers in training can use yoga anatomy to teach! Hence the last step to really learning yoga anatomy is to apply it to teaching! Teach the cue to someone else!
This last step works best with a partner. If you don’t have a partner, look at yourself in the mirror as if you were looking at a student!
Teach the cue to hour partner while they are Tadasana! Take your time and look at the body part you are cuing. This is truly where the magic of great teaching occurs. Observe what happens when you use the cue.
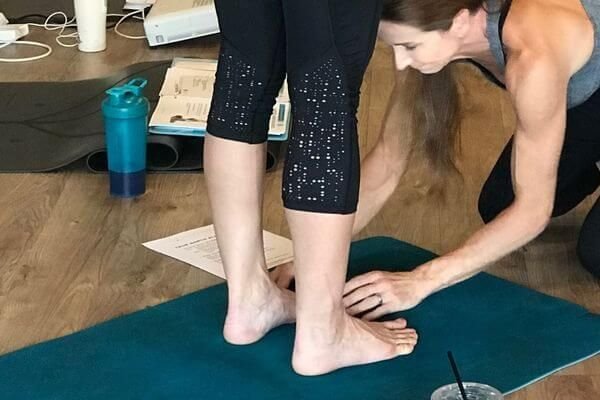
Play with the example of "Stretch your toes out as far as you can." Before you say the cue, look at your partners feet. Realize you are looking at their anatomy. Observe how much space is or is not between their toes. Then say the cue AND look closely at their anatomy moving! You are now mastering the cue because you understand the anatomy and why behind the cue.
This is so much different than memorizing cues or stumbling through trying to figure out what to say!
After you’re comfortable with the cue in Tadasana, teach other postures using the same cue. Keep practicing and have fun.
Remember, some of the cues may make more sense than others and that's normal. Meet yourself where you are and know that just by teaching these cues you are teaching anatomy informed yoga,
Ready to teach yoga with confidence?
Discover Power to Lead 200-Hour Yoga Teacher Training in Lisbon, Portugal. Led by Dr. Trish Corley - the only yoga teacher training in Portugal taught by a Doctor of Physical Therapy.
[Learn more about the 200 hour yoga teacher training in Lisbon]
About the Author
Dr. Trish Corley, PT, DPT (physiotherapist), E-RYT 500, is the founder of Yoga Anatomy School and a former anatomy professor with over 23 years of clinical experience. She has been teaching and mentoring yoga teachers in anatomy and biomechanics since 2012.
Explore the Yoga Anatomy Online Course at TrishCorley.com/yoga-anatomy-course.
For more articles and insights, visit TrishCorley.com.